Starting your journey in paper floristry begins with understanding how a simple sheet of paper transforms into a lifelike bloom through the right equipment. This guide explores the foundational essential tools for paper flower art, explaining their specific roles, selection criteria, and maintenance tips based on five years of professional experience.
Paper flower art is a delicate process that starts with a single sheet of paper, but the final quality of your work depends heavily on which essential tools for paper flower art you use and how you handle them. If you remember our previous discussion on paper flower care and preservation, you know that longevity starts with how a piece is built. Today, we will focus on the essential tools for paper flower art that make that construction possible. Many beginners feel overwhelmed by the variety of supplies available, wondering exactly how much they need to invest at the start.
In my years of both creating and teaching, I have learned to categorize equipment into 2 groups: essential tools for paper flower art that are necessary for the basic process, and auxiliary tools that enhance efficiency and detail. By focusing on these essential tools for paper flower art first, you can build a solid foundation without unnecessary pressure.
Why We Categorize Essential Tools for Paper Flower Art?
The most common question I hear from new students is, “Do I really need all of this?” The answer is that you do not need everything at once, but certain tasks cannot be performed without specific essential tools for paper flower art. These tools handle the core actions of the craft: cutting petals, shaping fibers, forming the stem, and bonding pieces together.
I used to think that any tool could be substituted, but I eventually realized that some items are foundational to the structural integrity of the flower. Essential tools for paper flower art are the ones that participate in every single project, regardless of the flower type. They are the permanent residents of your workbench that you will reach for every time you sit down to create.
Selecting Precise Scissors: The Most Critical Paper Flower Tool
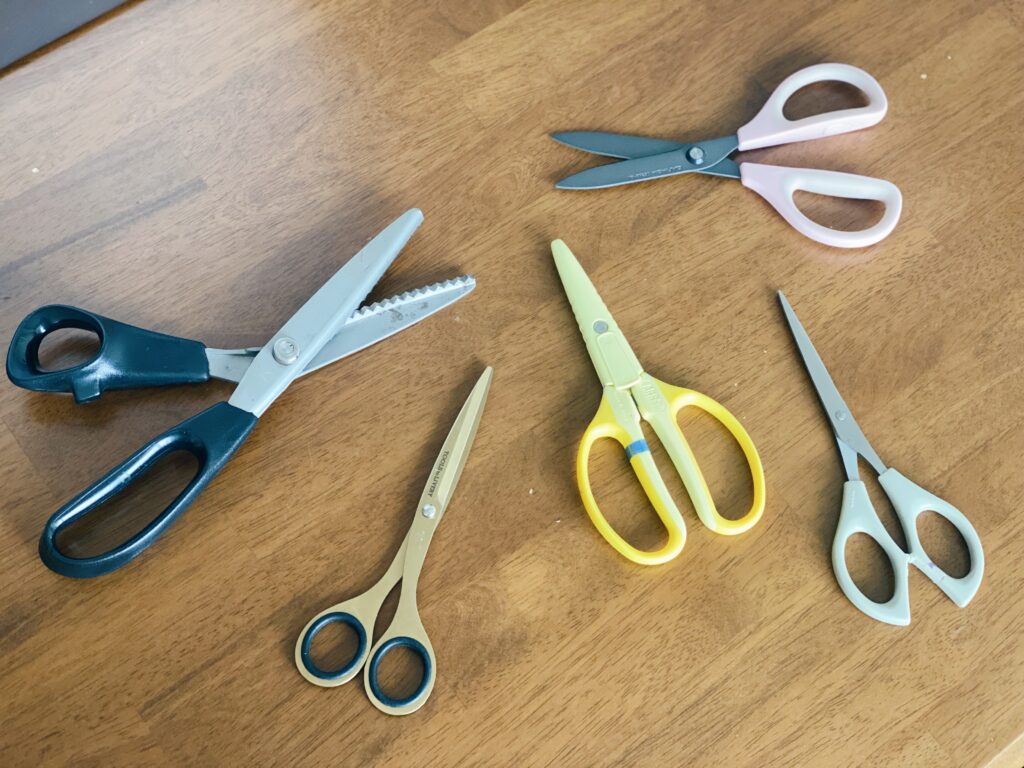
The most important item among the essential tools for paper flower art is undoubtedly a pair of high-quality scissors. Since every petal’s curve, edge, and minute detail is determined by the movement of your blades, a standard office pair is often insufficient. For professional results, your essential tools for paper flower art must include scissors that are sharp, thin, and come to a very fine point.
In my early years, I used common stationery scissors. I soon noticed that as the blades grew dull, they would “chew” the edges of the paper. This led to a ragged finish that was difficult to hide. A truly precise pair of essential tools for paper flower art should allow you to cut without “pushing” the paper. I now prefer tools like Japanese Choki scissors for fine detail and Tools to Liveby shears for larger cuts.
One rule I established after a year of ruined blades: never use your paper scissors to cut wire. Even a single snip of wire can create microscopic nicks in the blade, making it impossible to get a clean cut on paper again. Keeping a separate pair for “paper only” is the best way to maintain your essential tools for paper flower art.
The Role of the Awl in Shaping Essential Tools for Paper Flower Art
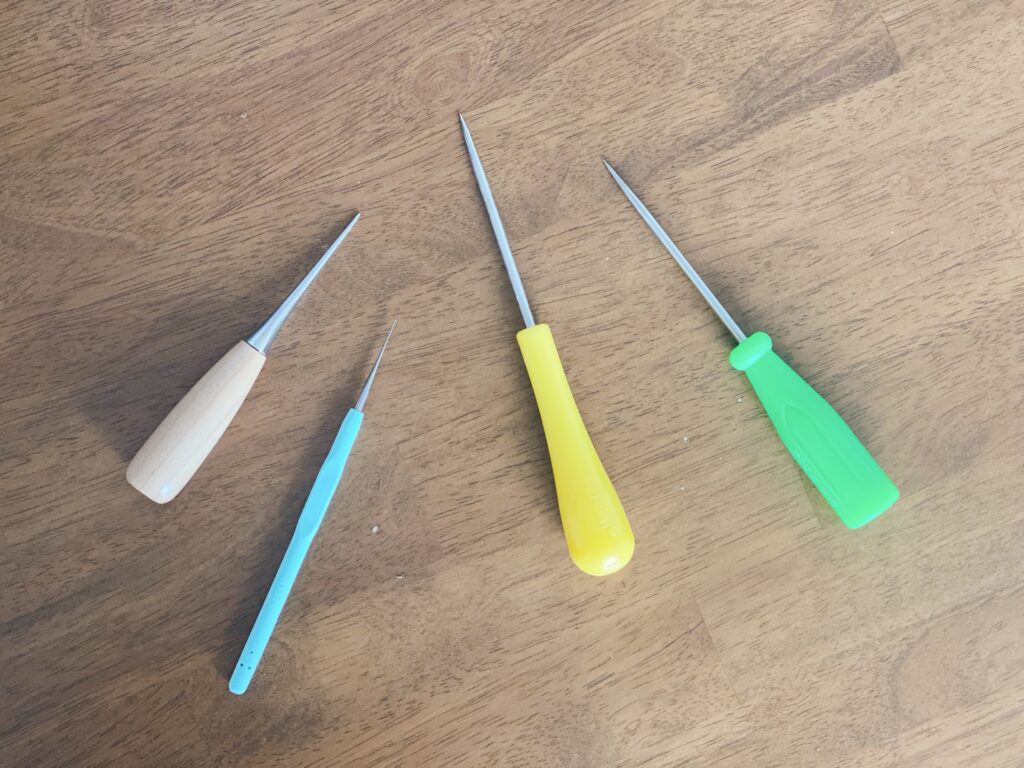
An awl is not just for poking holes; in the world of essential tools for paper flower art, it is a primary shaping instrument. It is used to press into the paper fibers to create veins or to curl the edges of petals. When I first began, I tried using the edge of my scissors to curl paper. Switching to a professional awl—one of the most versatile essential tools for paper flower art—provided a new world of control.
The awl allows for a much more nuanced application of pressure. You can use this essential tool for paper flower art to:
- Curl the very edges of petals for a natural look.
- Score realistic veins into leaves.
- Mark positions for assembly without leaving ink marks.
While you can substitute an awl with a thin metal rod, a tool with a comfortable grip significantly reduces hand fatigue. It is the tool that breathes life into a flat cutout, making it a cornerstone of essential tools for paper flower art.
Balancing Adhesives: Essential Glue Supplies for Paper Flowers
Assembly requires a reliable bond, making adhesives a key part of your essential tools for paper flower art. Beginners often rely on two main types: the hot glue gun and liquid tacky glue. Each has a different personality, and learning when to use which is a key milestone.
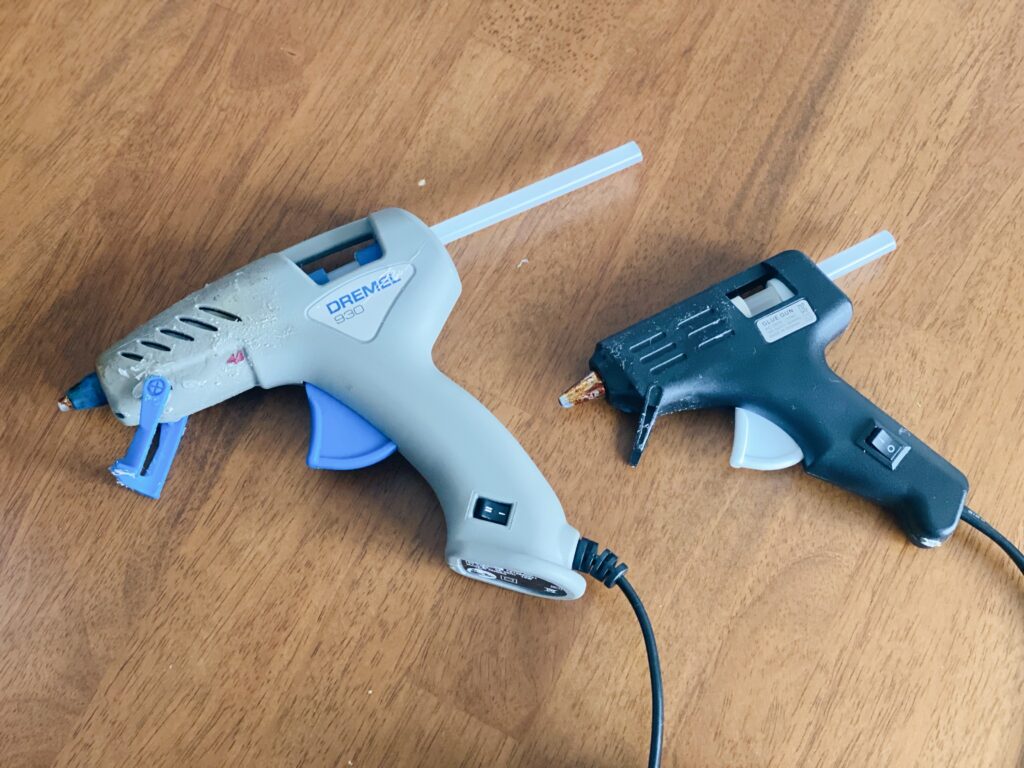
The hot glue gun is a staple in essential tools for paper flower art for “heavy lifting”—attaching the flower head to the stem or layering heavy petals quickly. However, hot glue can be bulky and create “spider web” strings. This is where tacky glue (or wood glue) becomes an essential tool for paper flower art that offers the “gift of time.” Because it dries more slowly, you can adjust the position of a petal until it is perfect. I specifically prefer it for attaching leaves because it doesn’t leave unsightly lumps. Using both in tandem is a secret to mastering your essential tools for paper flower art.
Structural Support with Essential Floral Wire and Tape
If the petals are the skin, the wire and tape are the skeleton and bark. These are the essential tools for paper flower art that support the weight of the bloom. Floral wire provides the axis, and it is categorized by gauge (#)—a smaller number means a thicker wire.
- 18 Gauge: For thick, main stems.
- 22–24 Gauge: For medium strength or grouping petals.
- 26–27 Gauge: For delicate leaves and fine branches.
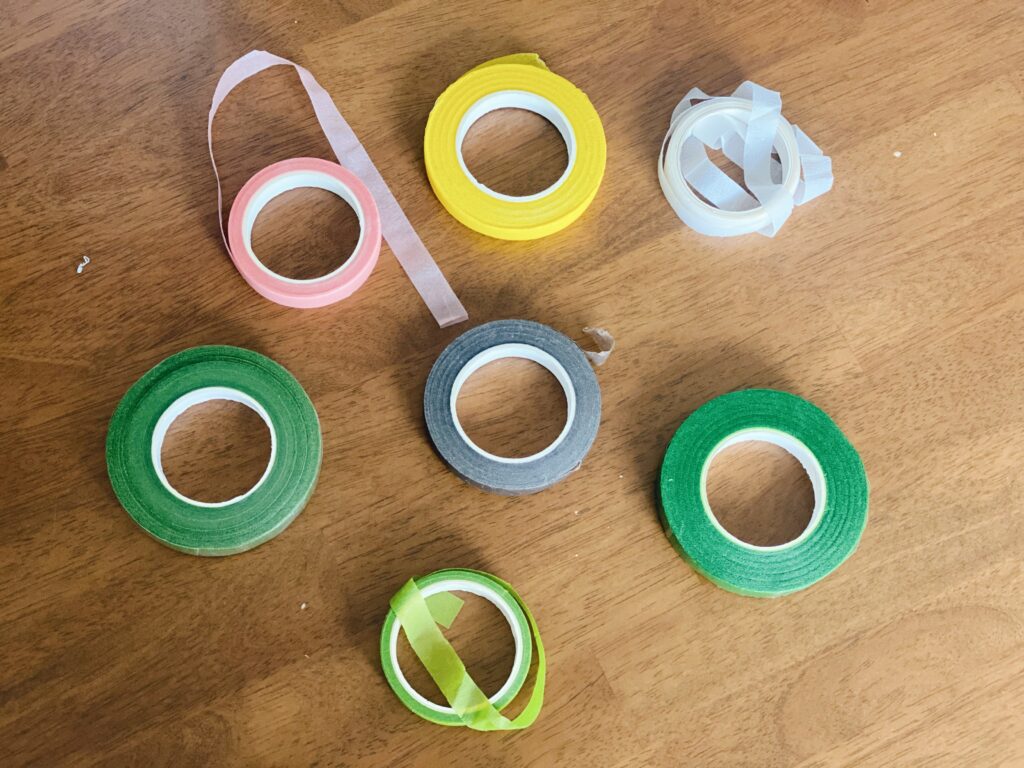
Floral tape is a unique member of the essential tools for paper flower art family; it becomes tacky only when stretched. A common mistake I see is beginners wrapping it without stretching, resulting in a loose finish. Learning to pull the tape taut while rotating the wire is a skill that defines professional essential tools for paper flower art usage. Initially, I used crepe paper strips, but I found that floral tape provides a much more durable and professional finish.
Summary of Essential Tools for Paper Flower Art
| Tool Category | Specific Tool | Best Used For | Author’s Insight |
| Cutting | Precision Scissors | Fringing and petal shaping | Reserve these strictly for paper to maintain sharpness. |
| Shaping | Metal Awl | Creating veins and sharp curls | A metal tip creates crisper lines than wooden skewers. |
| Bonding | Tacky Glue | Detailed, invisible bonding | Essential for keeping your work clean and professional. |
| Structure | Floral Wire | Stem and structural axis | Match the gauge to the weight of your flower head. |
| Finishing | Floral Tape | Covering wire for a natural look | Always stretch the tape to activate its adhesive. |
FAQ: Common Concerns About Essential Tools for Paper Flower Art
Do I need to buy expensive brands for my paper flower tools right away?
Not necessarily. The condition of the tool matters more than the price. Ensure your essential tools for paper flower art are clean and sharp. It is better to have a few well-maintained basic tools than a box full of expensive ones you don’t know how to use yet.
Is a hot glue gun better than liquid glue?
Neither is “better”; they serve different purposes. Hot glue is for speed and strength, while liquid glue is for precision and invisibility. As you grow, you will find yourself alternating between them naturally.
How can I tell if my tool is the problem or my technique?
This is a very common point of confusion. If you find yourself struggling, try the same action with a different tool or on a different scrap of paper. If a different pair of scissors suddenly makes your cuts cleaner, the tool was likely the issue. Learning is about adjusting your environment, not just “fixing” your hands.
Self-Check: Evaluating the Condition of Your Essential Tools
If your work feels difficult, take a moment to observe your current essential tools for paper flower art:
- The Cut: Is the edge clean, or are there tiny “hairs”? (Check your scissor sharpness.)
- The Surface: Is there old glue residue on your essential tools for paper flower art?
- The Bond: Is the glue seeping through or creating large gaps?
- The Stem: Is the floral tape unraveling or feeling loose?
- The Wire: Are you using a gauge that is too thin for the flower head?
Growing Your Kit of Essential Tools for Paper Flower Art
Choosing your essential tools for paper flower art is the first step in a rewarding relationship with your craft. Remember that these tools are here to support your hands, not to replace your unique touch. I’ve found that my favorite essential tools for paper flower art aren’t always the most expensive, but the ones I’ve spent the most time getting to know.
Don’t feel pressured to buy everything today. Start with the basics, see how the paper responds, and gradually expand your collection of essential tools for paper flower art. Every artist’s toolkit is a reflection of their own journey—let yours grow naturally. In our next post, we will look at auxiliary tools—like ball tools and punches—that can take your work to the next level.